
Industry
Consumer products
Parts where the surface finish matters as much as the dimensions, and where volumes ramp quickly.
What is different about this sector
On a consumer product the visible surface is the product. A part can be dimensionally perfect and still be rejected for a sink mark on a show face, a gate vestige in the wrong place, or a color that drifts between batches.
The second pressure is time. Consumer launches move fast and volumes ramp sharply, so tooling decisions made for speed at launch have to survive the volume that follows.
Getting cosmetic surfaces right
Cosmetic quality is decided in tool design, not on the production floor. By the time parts are being molded, the gate position, the ejector layout, and the tool finish are fixed.
- Nominate show faces on the drawing. Everything else follows from knowing which surfaces will be seen.
- Gates and ejector pins leave marks. Both have to be placed on non-visible surfaces, which constrains the tool layout.
- Weld lines form where flow fronts meet, typically behind holes and around bosses. Gate position decides where they land.
- Sink marks come from thick sections. Uniform walls and thin ribs prevent them; texture only hides them.
- Higher gloss shows every defect and needs more draft, not less. Matte and textured finishes are more forgiving.
- Agree a physical color and finish master. A color approved on a screen will be disputed on delivery.
Decoration methods
| Method | Best for | Notes |
|---|---|---|
| Pad printing | Logos and legends on curved or irregular surfaces | Low tooling cost, limited color count per pass. |
| Screen printing | Flat or gently curved surfaces, larger graphics | Good opacity and durability. |
| In-mold decoration (IMD) | High volume graphics that must not wear off | Film is placed in the tool and becomes part of the molding. Higher setup, excellent durability. |
| In-mold labelling (IML) | Containers and packaging | Label bonds during molding, eliminating a secondary step. |
| Laser marking | Serial numbers, date codes, permanent legends | No consumables, but color depends on the resin. |
| Hot stamping | Metallic foil effects | Simple and cheap for a premium visual cue. |
| Painting and soft-touch coating | Color matching and tactile finish | Widest color freedom. Adds cost and a masking operation. |
Overmolding and multi-material parts
Overmolding bonds a soft material, usually a TPE or TPU, onto a rigid substrate. It is how grips, seals, and soft-touch surfaces are produced without an assembly step.
On a cosmetic part the gate, the ejector pins and the parting line all leave marks, and their positions are fixed when the tool is designed. Deciding which face is the show face at the start of tool design costs nothing. Discovering it after the tool is cut usually means a new insert.
A two-shot part is molded rigid first, then the soft material is injected against it in a second cavity. The bond is chemical, so the pairing of the two resins matters more than the geometry. Done properly it removes an assembly operation, a gasket and a failure mode; done with an incompatible pair it delaminates in service.
- Material pairs have to be chemically compatible, or the bond fails. TPE grades are formulated to bond to specific substrates, so the pair is chosen together.
- Where a chemical bond is not achievable, design a mechanical interlock: undercuts, through-holes, or a keyed groove.
- Two-shot molding runs both materials in one tool and is faster per part, but the tool is significantly more expensive.
- Insert overmolding molds the second material over a pre-molded first part, which is cheaper in tooling and slower per part.
- Decide which route at design stage, because the part geometry differs between them.
Scaling volume after launch
- Launch on a prototype or bridge tool where the design may still change, and commit to production steel once it is stable.
- Multi-cavity tooling cuts unit cost sharply but must be planned before the tool is cut, not retrofitted.
- Color changes are cheap; geometry changes after production tooling are not. Fix geometry first.
- Plan packaging and any assembly operations as part of the tooling decision, since they affect cycle time and cost per part.
Ramp is planned at tool design: cavity count is chosen for the volume you expect in year two, not year one, so the same tool carries the program instead of being replaced halfway through it.
Also serving
Other industries
Medical injection molding
Molded components for medical devices. This page states what we can evidence for a regulated buyer, and what is still unconfirmed.
Automotive
Components for automotive programs, from prototype through production volumes.
Robotics
Structural and enclosure parts for robotics programs, where volumes sit between prototype and full production.
Questions
Frequently asked
What consumer product teams ask before tooling. Each answer comes from the sections above.
Ask an engineerHow do you protect a cosmetic show face on a molded part?
Cosmetic quality is decided in tool design, not on the floor: nominate show faces on the drawing so gate position, ejector layout and tool finish are set to keep vestiges, ejector marks, sink and weld lines off them. By the time parts are being molded those decisions are fixed.
Which decoration methods are available?
Pad printing for logos and legends on curved surfaces, screen printing for flat or gently curved graphics, in-mold labelling and decoration, laser marking, painting including soft-touch, hot stamping and foil, and overmolding of TPE or TPU for grips, seals and soft-touch surfaces without an assembly step.
How do we scale volume after launch without re-tooling twice?
Launch on a prototype or bridge tool while the design may still change, and commit to production steel once it is stable. Multi-cavity tooling cuts unit cost sharply but has to be planned before the tool is cut, so tell us the volume ramp you expect at the quote stage.
Representative part
What we mold for this sector
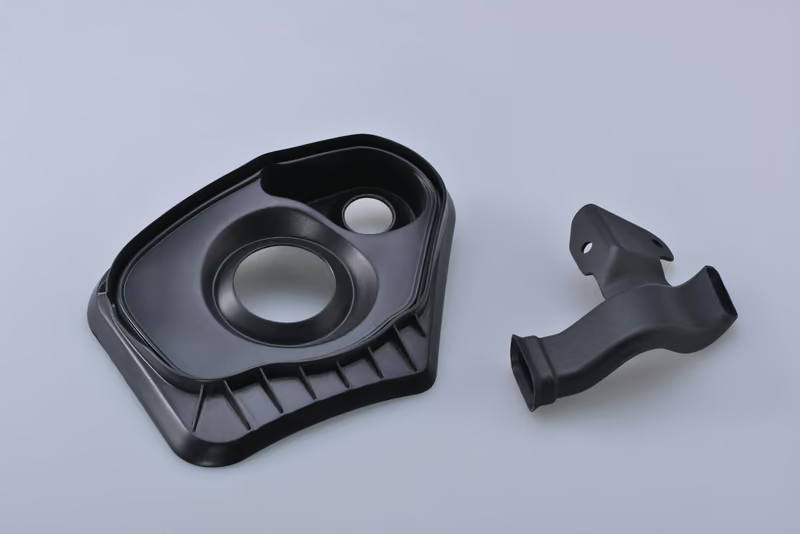
Fascia and handle
A fascia and handle molded as a set, where the surface finish off the tool is judged as closely as the dimensions.
Let’s get started on your part
Send your CAD files and target volumes. We come back with a price, a lead time, and any design notes that would reduce either.